How To Crate Train Your Dog

Learning how to crate train your dog is easy with this handy guide. Crate training is a wonderful way to create a safe haven for your pet while adding a useful management tool to your dog training repertoire.
Crate Training Your Dog Made Easy
If you have a new dog or puppy, you can use the Dog Crate to limit access to the house until she learns all the house rules like what he can and can’t chew on and where he can and can’t eliminate.
A crate is also a safe way of transporting your dog in the car, as well as a way of taking him places where he may not be welcome to run freely. If you properly train your dog to use the crate, she will utilitze it as a safe place and will be happy to spend time there when needed.
Selecting The Right Dog Crate
Crates may be wood, plastic, soft-sided nylon, or metal dog pens. They come in different sizes to accommodate all shapes and sizes. Your dog’s crate should be just large enough for him to stand up and turn around in. If you don’t want to use a crate, consider adapting a section or corner of your house as your dog’s personal den, and implementing a Dog Gate instead.
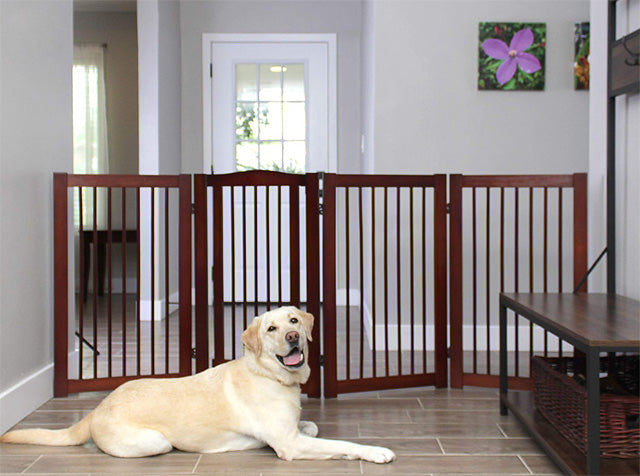
Above: We love the Primetime Petz Configurable Dog Gate With Door. Well built, easy to use, and best of all, it is simply gorgeous.
The Crate Training Process
Crate training can take days or weeks, depending on your dog’s age, temperament and past experiences. It’s important to keep two things in mind while crate training. The crate should always be associated with something pleasant, and training should take place in a series of small steps – don’t go too fast. We are huge fans of Positive Reinforcement Dog Training, and this method works for crate training as well.
Step 1: Introducing Your Dog To The Crate
Put the crate in an area of your house where the family spends a lot of time, such as the family room. Put a soft blanket or towel in the crate. Bring your dog over to the crate and talk to him in a happy tone of voice. Make sure the crate door is securely fastened opened so it won’t hit your dog and frighten him.
To encourage your dog to enter the crate, drop some Healthy Dog Treats near it, then just inside the door, and finally, all the way inside the crate. If he refuses to go all the way in at first, that’s okay. Don’t force him to enter. Continue tossing dog treats into the crate until your dog will walk calmly all the way into the crate to get the food. If he isn’t interested in treats, try tossing a favorite dog toy in the crate. This step may take a few minutes or as long as several days.
Step 2: Feeding Your Dog His Meals In The Crate
After introducing your dog to the crate, begin feeding him his regular meals near the crate. This will create a pleasant association with the crate. If your dog is readily entering the crate when you begin Step 2, put the dog bowl all the way at the back of the crate.
If your dog is still reluctant to enter the crate, put the dish only as far inside as he will readily go without becoming fearful or anxious. Each time you feed him, place the Dog Bowl a little further back in the crate.
Once your dog is standing comfortably in the crate to eat his meal, you can close the door while he’s eating. At first, open the door as soon as he finishes his meal. With each successive feeding, leave the door closed a few minutes longer, until he’s staying in the crate for ten minutes or so after eating.
If he begins to whine to be let out, you may have increased the length of time too quickly. Next time, try leaving him in the dog crate for a shorter time period. If he does whine or cry in the crate, it’s imperative that you not let him out until he stops. Otherwise, he’ll learn that the way to get out of the crate is to whine, so he’ll keep doing it.
Step 3: Conditioning Your Dog To The Crate For Longer Time Periods
After your dog is eating his regular meals in the crate with no sign of fear or anxiety, you can confine him there for short time periods while you’re home. Call him over to the crate and give him a treat. Give him a command to enter such as, “kennel up.” Encourage him by pointing to the inside of the crate with a treat in your hand.

Above: This Double Door Dog Crate by Internet's Best is a new favorite. Plenty of room, and tthe dog bed is included. The double door system provides easy of access. Plus, the elegant wood design ensures it will look great in any room.
After your dog enters the crate, praise him, give him the treat and close the door. Sit quietly near the crate for five to ten minutes and then go into another room for a few minutes. Return, sit quietly again for a short time, then let him out of the crate. Repeat this process several times a day. With each repetition, gradually increase the length of time you leave him in the crate and the length of time you’re out of his sight.
Once your dog will stay quietly in the crate for about 30 minutes with you out of sight the majority of the time, you can begin leaving him crated when you’re gone for short time periods and/or letting him sleep there at night. This may take several days or several weeks.
Step 4: Part A - Crating Your Dog When Left Alone
After your dog is spending about 30 minutes in the crate without becoming anxious or afraid, you can begin leaving him crated for short periods when you leave the house. Put him in the crate using your regular command and a treat. You might also want to leave him with a few safe Dog Toys in the crate.
You’ll want to vary at what point in your “getting ready to leave” routine you put your dog in the crate. Although he shouldn’t be crated for a long time before you leave, you can crate him anywhere from five to 20 minutes prior to leaving. Don’t make your departures emotional and prolonged, but matter-of-fact. Praise your dog briefly, give him a treat for entering the crate and then leave quietly.
When you return home, don’t reward your dog for excited behavior by responding to him in an excited, enthusiastic way. Keep arrivals low key. Continue to crate your dog for short periods from time to time when you’re home so he doesn’t associate crating with being left alone.
Step 4: Part Part B - Crating Your Dog At Night
Put your dog in the crate using your regular command and a treat. Initially, it may be a good idea to put the crate in your bedroom or nearby in a hallway, especially if you have a puppy. Puppies often need to go outside to eliminate during the night, and you’ll want to be able to hear your puppy when he whines to be let outside. Older dogs, too, should initially be kept nearby so that crating doesn’t become associated with social isolation. Once your dog is sleeping comfortably through the night with his crate near you, you can begin to gradually move it to the location you prefer.
Potential Crate Training Problems
Too Much Time In The Crate
A crate isn’t a magical solution. If not used correctly, a dog can feel trapped and frustrated. For example, if your dog is crated all day while you’re at work and then crated again all night, he’s spending too much time in too small a space. Other arrangements should be made to accommodate his physical and emotional needs. Also remember that puppies under six months of age shouldn’t stay in a crate for more than three or four hours at a time. Puppy Pads are a must have, since puppies can’t control their bladders and bowels for longer periods.
Whining And Howling
If your dog whines or cries while in the crate at night, it may be difficult to decide whether he’s whining to be let out of the crate, or whether he needs to be let outside to eliminate. If you followed the training procedures outlined above, your dog hasn’t been rewarded for whining in the past by being released from his crate. Try to ignore the whining. If your dog is just testing you, he’ll probably stop whining soon. Yelling at him or pounding on the crate will only make things worse.
If the whining continues after you’ve ignored him for several minutes, use the phrase he associates with going outside to eliminate. If he responds and becomes excited, take him outside. This should be a trip with a purpose, not play time. If you’re convinced that your dog doesn’t need to eliminate, the best response is to ignore him until he stops whining. Don’t give in, otherwise you’ll teach your dog to whine loud and long to get what he wants. If you’ve progressed gradually through the training steps and haven’t done too much too fast, you’ll be less likely to encounter this problem. If the problem becomes unmanageable, you may need to start the crate training process over again.
Separation Anxiety
Attempting to use the crate as a remedy for Separation Anxiety won’t solve the problem. A crate may prevent your dog from being destructive, but he may injure himself in an attempt to escape from the crate. Separation anxiety problems can only be resolved with counter-conditioning and desensitization procedures. You should consult a professional animal behaviorist for help if you feel your dog may be suffering from separation anxiety.
Crate training your dog is simple once you learn the key steps, and follow through with consistency. For new dog owners, check our related article, The Top 3 Mistakes That New Dog Owners Make. If you are new dog owner, our tips on How To Choose The Right Dog Bed can be a great help. Adopting a puppy? Good for you! Read our Puppy Training 101: Five Basic Tips to ensure you and your new furry friend get off to a great start.